
While recently discussing dovetails with some friends I asked how many dovetails could they name. Most admitted four or five. When I obtained my AAS degree in Fine Woodworking I had to list nine. So I began to research the different types of dovetails for a formal discussion at a local woodworking group. I ended up with over fifteen different types of dovetails. Types of dovetails Here is the power point presentation I gave to spark some lively discussions. Remember this is to inform you of the many types of dovetails and their uses – not how to make dovetails. How many of these are new to you? Have you made any of these in any of your projects?
Enjoy your shop time,
Jerill
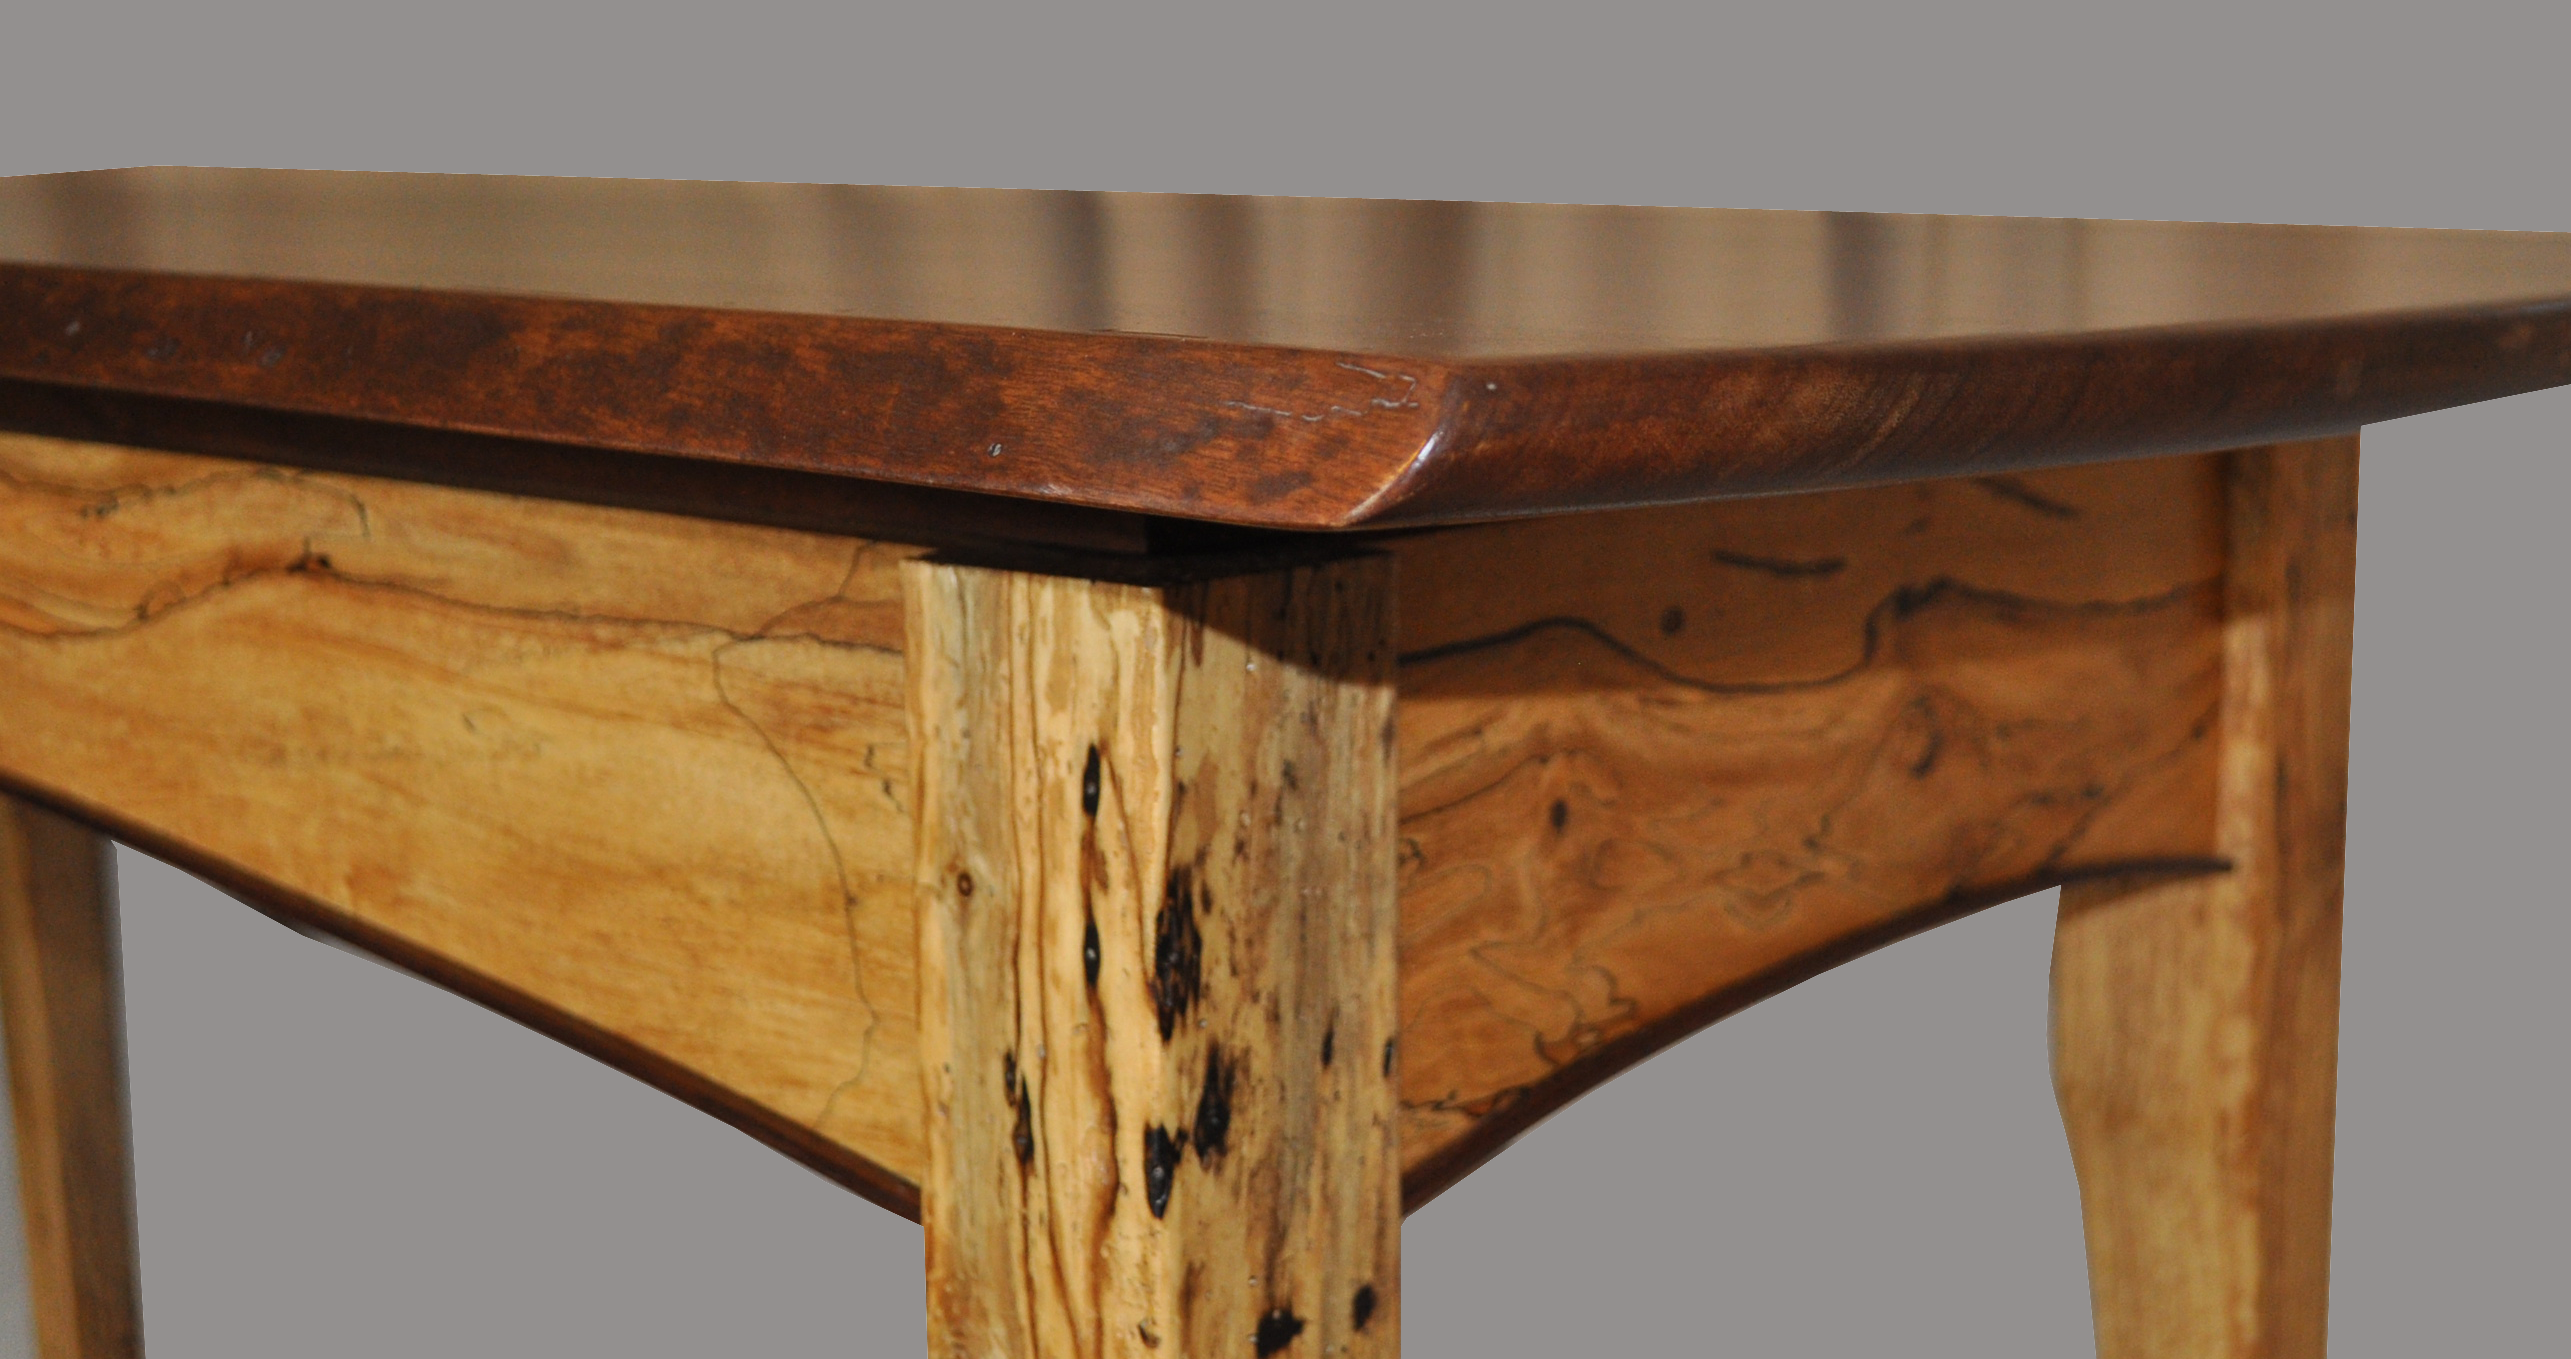 One of the reasons I enjoy woodworking is because there are so many different ways to complete the same task. In most cases there is no “right” or “wrong” way but instead a method that is most suited to your style and comfort of woodworking. Some base their woodworking decisions on the tools that they own or the knowledge they have acquired. I like trying different methods to continually expand my knowledge and skill level. A good example is a mortise and tenon joint. Let’s look at some of the different way of making just the mortise. I know a lot of woodworkers that prefer the old method of using a mortising chisel and mallet. With a drill press you can easily and accurately drill a series of overlapping holes that need minor clean up with a chisel. A hand-held router can be used to produce this joint as well as a table mounted router. There are dedicated mortising machines that function like a horizontal router table that do a great job making this joint. There are new hand-held machines that make a mortise joint designed for a loose tenon. All of these (and other methods) will serve the needs of the woodworker with the proper knowledge and skill. I prefer the dedicated mortising machine because it is quick, easy and accurate. The finished results are hidden and no one can tell what method was used by the artist to complete the project. So why is it important which method is used? It matters to the craftsman! Many artists take great pride in the particular method they used and market their goods that way. Others look at this as a business decision – the fastest method that will perform adequately. So instead of debating which method is “best” look at the completed project and marvel at the skill and knowledge of the woodworker in making the finished piece.
Which method do you use for making a mortise?
Enjoy your shop time,
Jerill

There is considerable interest in “green woodworking” in this day and time. Most think this means using green or wet wood or woodworking without the use of utilities. Some think of it as a way of utilizing the resources available instead of wasting or discarding them. I am completing a “green woodworking” job for a client now that has taken almost two years from start to finish. In a nearby community the decision was made to consolidate and build a new middle school. A parcel of property listed on the National Historic Registry was chosen. The one time prominent building that was on this land was in such bad shape that it was not salvageable. Prior to the demolition I inquired about all the trees that were standing in the way of progress. No one had considered them as a resource. The plan was for the excavating contractor to dispose of these trees. I informed the decision makers that they are a valuable resource and not waste. I struck a deal and trucked all the logs to a local sawmill and had them cut to my specifications. After air drying for a short period I loaded the boards into my kiln to finish drying. The project manager was interested in having something built and placed in the school to help remind the students of the significance of the historic site. I designed and built a three benches each with a custom panel referencing the historic past. Because the benches were built for specific areas in the school each was custom sized for placement, as well as, the size of the children who will be using them- (middle school students). I find great pleasure in taking “waste” wood and creating a useful piece. I hope that throughout the coming decades that these benches are a testament to my work – better than burying the wood as originally planned!
Enjoy your shop time,
Jerill
As most of you know, there is a wave of winter invading the northeast producing snow and extreme cold weather.  Since the weather prohibits most outdoor activities (except those related to the snow) it is a good time to make some sawdust in your shop. Is it too cold for you to enjoy some woodworking? Although I discussed this in a previous blog (https://www.jerillvancewoodworks.com/cold-woodworking/) I recently realized not all woodworking is done in the shop! I know some craftsmen that make rustic “stick” furniture and they prefer working outside. The use of a grinder to sculpt wood is so aggressive and produces a quick pile of shavings so most don’t do this indoors. A lot of purists that use a shaving horse don’t work indoors. Still others enjoy the task of harvesting their own logs and milling their own boards. Of course, this is done outside and many prefer the wintertime to drag logs in to their mill. I occasionally obtain logs but prefer the comfort of good weather to do so. However, this cold blast from Mother Nature is effecting the operation of my kiln!
  When it is in the single digits I have a hard time maintaining an elevated temperature. I can still dry wood just not at my prefered rate. Although I enjoy looking out my shop window at the blanket of snow covering the ground I realize this cold weather is not convenient for every woodworker. I hope this weather does not bother your opportunity to work with some wood – what ever form of woodworking you prefer! How has this cold blast caused you to alter your woodworking habit?
Enjoy your shop time,
Jerill
Like most woodworkers, I get requests to build something in a hurry and without spending a lot of money on supplies. Most of the time I schedule the work but this request was from someone special. The client, my wife, wanted a mobile horse tack chest to give as a Christmas gift. Together, we designed this piece to suit the needs of the gift recipient. Since sheet goods are expensive I decided to use some poplar that I obtained at a modest price from a mill because it had not been cut to specification (13/16″ thick – rough – after drying). 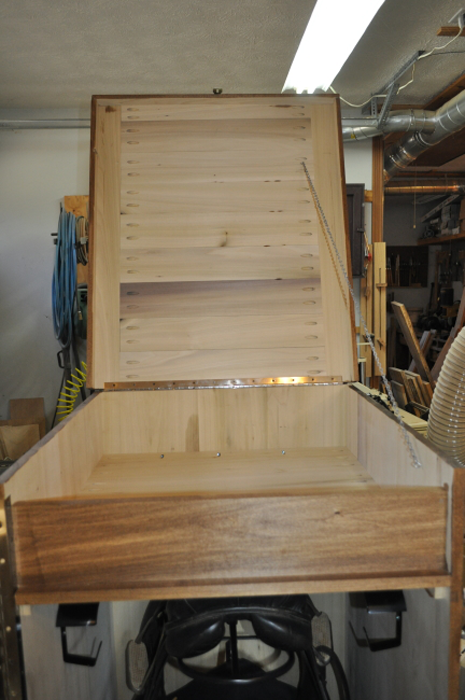
To build something quickly I decided to use pocket hole joinery so the obvious solution was the Kreg Jig. Because the wood dimensioned out at 5/8″ thick, the Kreg Jig easily adjusted to this thickness since this tool can be adjusted in 1/8″ increments. Although the chest is large and heavy, I have faith that the pocket hole joinery will withstand the issues of transportation. The chest is designed to store two saddles, multiple bridles, lead ropes, tack cleaning supplies, horse cleaning supplies, and grooming supplies for the rider.
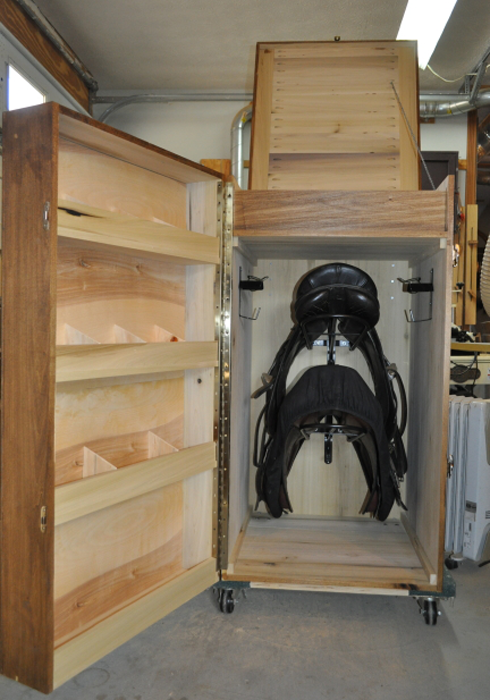
Storage for two saddles
Because this is a functional piece that will be used in rugged conditions, visibility of the pocket holes are not an issue. By turning a maple handle that I installed on the back and placing wheels on the bottom, this chest can be moved like a dolly. This makes the chest easy to transport to a horse show and roll to the horse stall. 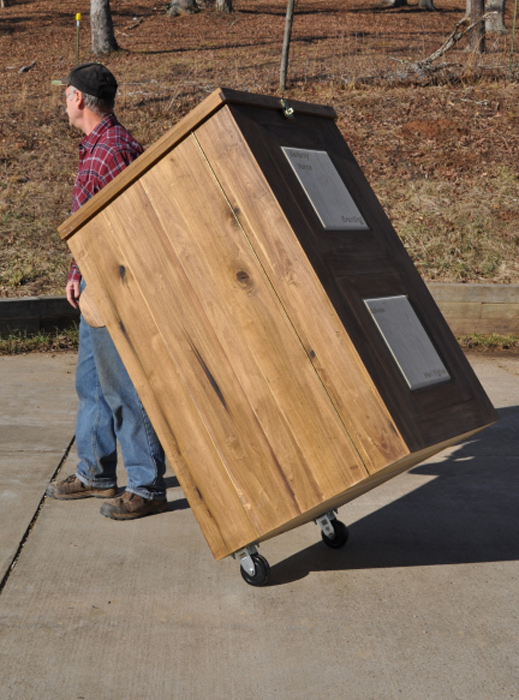
The Kreg Jig is a very useful tool that has a place in your shop or tool box. Do you own a Kreg Jig? What have you built with this versatile tool? The next time you use pocket hole joinery give the Kreg Jig a test run.
Enjoy your shop time,
Jerill
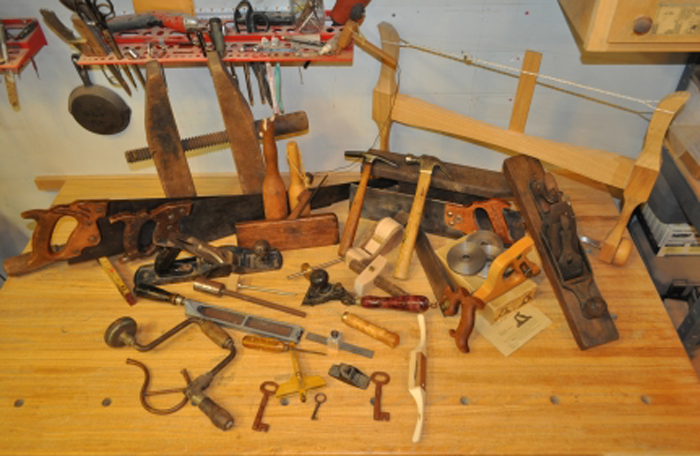
Woodworkers not only need tools but also value them for the use they serve. Most craftsman drool over new tools that make specific tasks easier to perform. Some look through flea markets and yard sales for a good deal on a used tool. I like new, quality tools and also enjoy looking for used tools to serve my needs. Over the course of time I have been given and “handed down” tools from some special individuals. These are my “treasured tools” that have a special meaning to only me. My paternal and maternal grandfathers, my father, my brother, other relatives and even some of my high school friends have blessed me with some of their personal tools. Some of these are hand-made or crudely repaired to continue their life. Many of these tools are not top quality or even in useable shape but they have a significant meaning to me personally. Most of these prized tools enjoy a specific perch on a shelf overlooking my shop full of tools. From time to time I find myself glancing up and seeing these tools and thinking back to when the previous owner reaped the benefit of using the tool. A custom marking gauge made for me by a close friend, a hand plane from my grandfather, a broken folding rule from my other grandfather, a hand saw from my dad or a hammer from a fraternity brother are tools that money can not buy. When I think of these items I think of the individuals that entrusted them to me. Their love of the tool and what they accomplished with it lives in my mind. I hope someday some of my tools, especially my hand-made ones, will sit on a special shelf and generate good thoughts from the future owner. Do you have any “special” tools that are priceless? Have you made any tools that you would not sell but hope to leave to someone who truly appreciates tools? Items like these keep the “faith” of woodworking alive and for future generations.
Enjoy your shop time and tools,
Jerill
I recently built a Moxon vise to make it easier for me to cut dovetails at the “work station” instead of my work bench. I have better light at the work station, therefore, it is much easier to see to mark and cut the dovetails. However, I did modify the Moxon vise to suit my needs. That is the good thing about woodworking – most craftsmen make changes to satisfy their own situation. When I was studying woodworking in college, my instructor, John Wesley Williams, insisted that I design my own items prior to building them. I was not allowed to use existing plans. Most of the time I was required to make a prototype or model. That has helped me tremendously in my business. I get requests all the time to make a piece of furniture to suit the clients needs, so I design and build a piece for an existing space, a custom size or custom style for the customer. To modify an existing shop made tool, no matter how old the design, seems natural to me. If you have a need for a special, shop made tool don’t hesitate to modify it to fit your personal needs. Afterall, you are the one that will be using it! I would like to hear about any shop made tools or jigs that you have customized for your use.
Enjoy your shop time,
Jerill
To minimize wood movement, the moisture content needs to be a known factor. Most woodworkers use a moisture meter to measure the amount of water left in the wood after the drying process but this is not always accurate, no matter what the type (pin or pinless) or brand. There are too many variables for moisture meters to repeat the true amount of water in a board. How the log is cut (plain, rift or quarter sawn), as well as, the grain abnormalities are not consistent. Then the cell structure of the boards and errant use of the meter plays a role in the inaccurate measurements. The only accurate method (and scientific method) to measure the MC of wood is called “oven dried” (OD) or “total solids”. This method involves placing samples of the board in an oven (about 250 to 350 degrees F) for up to 24 hours until all moisture is removed. The samples of wood are weighed on a small-scale until the weight stabilizes indicating all the moisture is gone. The scale I use measures in grams. I can then calculate the amount of moisture in the samples boards as well as the boards in my kiln. I use the oven in my kitchen so it is on for an extended time. Because I am frugal, I prefer to bake a cake while drying the wood samples. So recently I had an OD cherry wood cake! How do you measure the moisture content of the wood you use? If you need help determining the moisture content let me know – maybe I can help.
Enjoy your shop time,
Jerill
Wood is hygroscopic – it gives off water and takes on water as the environment changes. So, wood is continually shrinking and expanding as it acclimates to the environment. Freshly cut or “dead green” wood can have over 100% moisture content so it will shrink a lot as it dries. Woodworkers know that the recommended moisture content of wood for furniture or indoor use is 6% to 8% (for the area I live). This is based on the equilibrium moisture content of the inside of homes in a designated region. Everyone I know who works with wood uses kiln dried or air-dried wood. Many prefer air-dried and some like kiln dried wood. Which do you prefer? I live on a farm, so I have the pleasure of storing wood (properly ricked) in my barn loft for a period of time prior to placing it in the kiln. I have an EBAC LD-800 dehumidification kiln so I can dry about 800 to 1000 bd ft of wood to the recommended moisture content. Obtaining logs from various places and having them milled to my specifications results in a nice supply of quality boards. With patience and time I can have properly dried wood for my woodworking habit. How do you obtain dried wood or how do you dry your wood? If you need your wood dried contact me and maybe I can help you.
Enjoy your shop time,
Jerill
In woodworking most tools need to be sharp to do quality work. We spend a great deal of pride and time in getting them sharp and maintaining the edge. Many woodworkers have asked me when is a cutting edge sharp. There are several methods to determine if an edge is sharp but I always say if you can do quality work with minimal effort then the tool is sharp enough for that task. And until recently I did not think anything in the shop could be too sharp. This summer I actually cut my skin (similar to a paper cut) on the edge of a board after I dimensioned that board. The edge is always knocked off during the sanding stages so the danger is not there for very long. Of course all the edges need to be sanded slightly round prior to applying a film finish because the finish will not adhere to a sharp edge. So for the first time I have to admit that an edge can be too sharp! Are the edges in your shop sharp enough or too sharp?
Enjoy your shop time,
Jerill